
As the digital landscape evolves, so do the tactics employed by cybercriminals. Phishing attacks, where hackers attempt to trick users into divulging sensitive information, have become increasingly sophisticated. To stay one step ahead, Yahoo and Google have announced they’re implementing new email authentication requirements to protect their users from falling victim to these malicious activities.
Authenticating your outbound email verifies to a receiving mailbox provider that a message actually came from your organization, or was sent on your behalf from an authorized third-party, like Constant Contact. For many email service providers, if you don’t meet these requirements, emails from your domain will be bounced. Here are the steps to setup self-authentication in Constant Contact.
Self-Authentication Using CNAME Records
In Constant Contact, click Add Self-Authentication
Select Self-authenticate using DKIM CNAME records and Continue
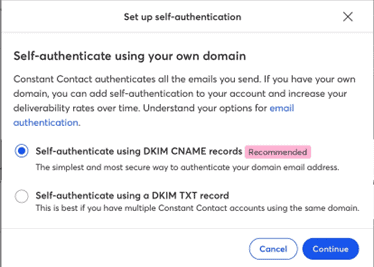
Click copy information to copy all of the records needed for Constant Contact. Paste this information into any text editor to save it for the next steps.
Navigate to your DNS Records.
For our example, we will use GoDaddy. Please note that every hosting provider has a slightly different interface. If you need assistance adding the records, please reach out to the support for your provider.
In GoDaddy, under Domain, click Domain Settings for the domain you wish to self-authenticate. Select DNS.
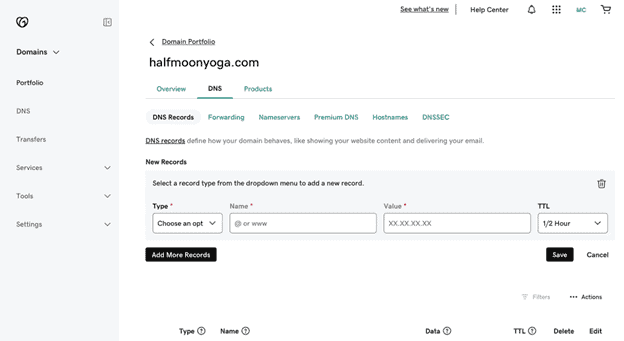
Click Add New Record
Select CNAME for Type
From the information you saved from Constant Contact, copy the CNAME 1 Record Name and paste it into the DNS record Name field. Copy the CNAME 1 Value and paste it into the DNS record Value field.
Click Save
Click Add More Records
From the information you saved from Constant Contact, copy the CNAME 2 Record Name and paste it into the DNS record Name field. Copy the CNAME 2 Value and paste it into the DNS record Value field.
Click Save
Publish a DMARC policy in your DNS Records
Constant Contact will provide the basic record you need to add, but if you want more control over your DMARC policy you have the option to create your DMARC policy with additional tags. For more information, see: https://knowledgebase.constantcontact.com/email-digital-marketing/articles/KnowledgeBase/7644-What-is-DMARC?lang=en_US
In your domain registrar, click Add More Records
For Type, select TXT or DMARC
From the information you saved from Constant Contact, under DMARC policy, copy the TXT Record Host Name and paste it into the DNS record Name field. Copy the TXT Record Value and paste it into the DNS record Value field.
Click Save
In Constant Contact, click OK and Activate
Congratulations, you have successfully completed important steps to improve email deliverability, enhance security and protect your brand!
Tip: If you lose the Constant Contact self-authentication screen, you can navigate back by selecting account settings, advanced settings and self-authenticate your email address
This blog is courtesy of MMC Web Developer Allison Stephanouk